

Below are key guidelines for correct installation angles and diaphragm replacement.

Recommended Installation Angle
For optimal drainage and cleanability, sanitary diaphragm valves should be installed at a downward angle of 15° to 30° from the horizontal plane.
Why this matters:
Prevents product accumulation in the valve body
Ensures complete drainage during CIP (Clean-in-Place) cycles
Avoids bacterial growth in "dead zones"
Avoid: Vertical installation with the bonnet facing downward – this can trap fluid and compromise hygiene.
How to Replace the Diaphragm
The diaphragm is the only wearable part in a sanitary diaphragm valve. Replacing it is simple and requires minimal downtime.
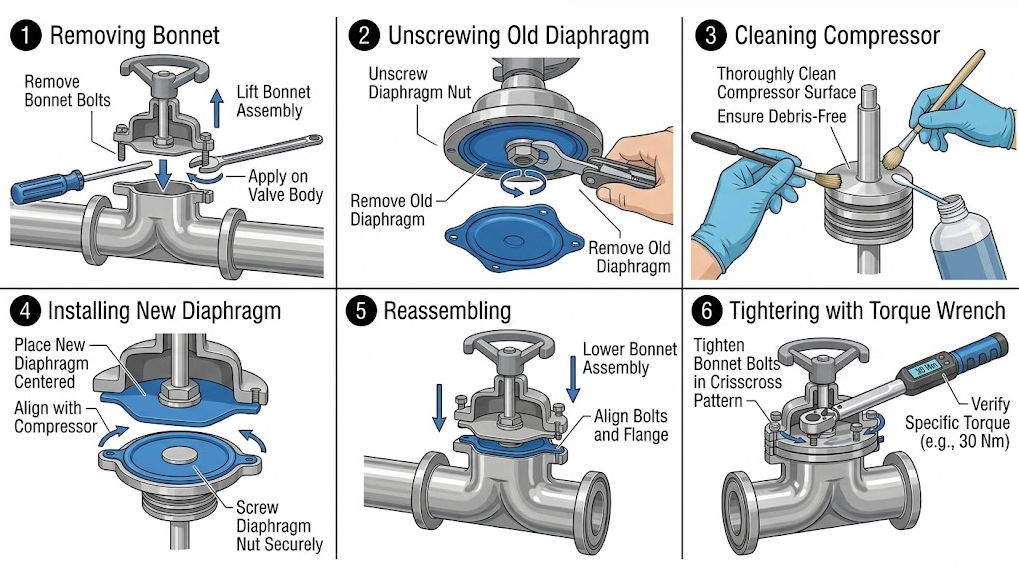
Step-by-Step:
Isolate the valve and depressurize the line.
Remove the bonnet (actuator or handle assembly) from the valve body.
Unscrew the old diaphragm from the compressor.
Clean the compressor threads and valve body sealing surface.
Install the new diaphragm – ensure it is centered and sits flat.
Reassemble the bonnet and tighten evenly to the manufacturer's torque specification.
Perform a function test to verify proper sealing and operation.
Why Choose ANMAX Sanitary Diaphragm Valves?
Mirror-polished surfaces (Ra ≤ 0.4 µm) for superior cleanability
Full material traceability and mill test reports
Available in 316L stainless steel with EPDM, PTFE, or FKM diaphragms
Compliant with FDA, USP, GMP, and 3A standards
Sizes ranging from DN10 to DN100 with various end connections (clamp, weld, or thread).